
How To Read Guitar Chord Charts
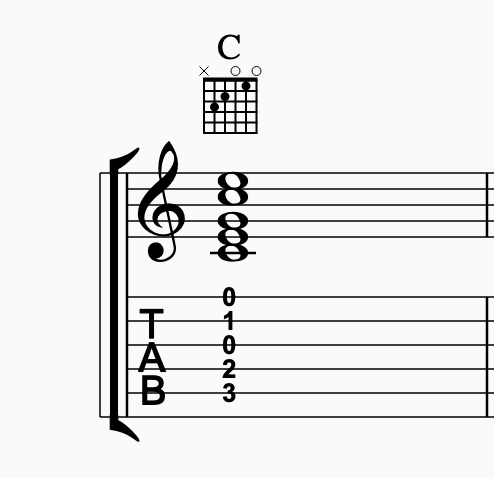
Fretted string instruments are unique in the sense that chords can be written and communicated in methods other than traditional notation, such as tablature and chord charts (or, more accurately, chord diagrams) — check out the example of all three formats below.
This article will focus on chord diagrams, as they are a straightforward and efficient way to learn chord shapes. Even if you have encountered chord diagrams previously, this will serve as an excellent refresher. Let’s go!
What is a Guitar Chord Chart?
A guitar chord chart visually represents the different chords that can be played on a guitar. It includes a guitar fretboard diagram with various chord shapes and symbols indicating which notes should be played. The diagram also provides information on the fingerings used to play the chords.
Chord charts are an excellent tool for beginning guitar students because they provide a visual reference for learning and playing chords. They can also be used to help students transpose chords to different keys or to compose new songs. With practice, guitar chord charts can be an excellent resource for furthering your understanding of guitar chords.
Benefits of Learning How to Read Guitar Chord Charts
Learning how to read guitar chord charts is invaluable for any guitar student. There are numerous benefits to understanding these diagrams, including the ability to play songs in any key, transpose chords, and expand your chord vocabulary.
Understanding how to read guitar chord charts is a great way to expand your guitar knowledge and improve your playing. With practice, you’ll be reading and playing chords like a pro in no time.
The Basics of Reading Guitar Chord Diagrams
Chord diagrams consist of a grid created by 6 vertical lines and 5-6 horizontal lines. The vertical lines represent the strings of the guitar and are almost always arranged, with the leftmost line representing the low E string (sixth string) and the rightmost line representing the high E string (first string). The four lines in between represent the remaining four strings of the guitar, directly representing the instrument. So far, so good? Great.
The horizontal lines represent the guitar’s frets, and as such, they can vary in number. For example, if a chord only occupies two frets (like an E major chord, for example), it is unnecessary to create additional horizontal lines. However, it’s common practice to represent 4-6 frets in each diagram to give greater context and avoid confusion.
Additionally, when a chord is in the first position (within the first four frets of the guitar), it’s essential to represent the nut with a heavy, thick black line. Doing so makes it obvious that the chord is played in the first position.
Creating Chords Using Chord Diagrams
Now that we have created our string and fret grid, we can begin placing notes on the proper strings and frets. Typically, an opaque dot represents which string and fret to place a finger. Occasionally, fingering numbers will be written inside—or next to—the dots. These numbers indicate the preferred figure used to play each note.
Many first-position chords use open strings. These open-position chords are often called cowboy chords. We can represent the inclusion of an open string by adding a white (or hollow) circle above the heavy, thick black line that represents the nut. Conversely, if an open string is not included, we will write an “X” above the string.
Beyond the Basics
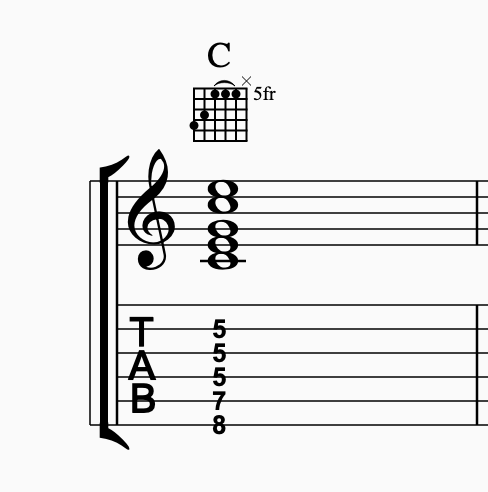
Of course, we can play chords all over the neck, not just the first position. When a chord is not played in the first position, two important pieces of information are needed: the fret number (this often corresponds with the location of the first finger) and a curved line indicating any barred strings. This is useful to know if you’re learning to play barre chords. Check out the example below. It is the same chord and same notes as the previous example, but it is played in a different position and uses a partial barre.
Tips for Reading Guitar Chord Charts
Guitar chord charts are an essential tool for learning and playing songs. While they may seem confusing at first glance, there are some tips and tricks to make reading them more manageable.
It is essential to learn the most common chords and their shapes. This will make it easier to recognize the chords on the chart. Additionally, memorizing the most popular chords will make identifying them in a chart easier. Finally, practicing with different chord shapes is essential for mastering the art of reading guitar chord charts.
By committing these tips to memory and practicing them, you can quickly become a proficient reader of guitar chord charts. Don’t be discouraged if you don’t understand the charts at first, it takes time, patience, and practice.
Final Thoughts
Chord diagrams (or chord charts) are an excellent and invaluable tool for learning chords. However, you can maximize their usefulness when they are used in conjunction with standard notation and tablature. Learning and understanding note relationships and chord shapes using all available information will expedite the process of internalizing chords and help with reading chords written in standard notation.
Now that you better understand how to read guitar chord charts, it’s time to take the next step in your guitar journey. Contact Green Hills Guitar Studio for private guitar lessons for more guidance and personalized instruction. With the help of experienced teachers and close guidance, you can take your guitar playing to the next level.

![How to Find the Best Guitar Instructor [Parents & Adult Learners] | Green Hills Guitar Studio](https://greenhillsguitarstudio.com/wp-content/uploads/2026/02/How-to-Find-the-Best-Guitar-Instructor-Parents-Adult-Learners-768x512.jpg)